Synopsys and Ansys power the future of innovation—connecting silicon to systems.
-
-
학생용 무료 소프트웨어에 액세스하기
차세대 엔지니어에게 힘을 실어주는 Ansys
학생들은 세계적 수준의 시뮬레이션 소프트웨어를 무료로 이용할 수 있습니다.
-
지금 바로 Ansys에 연결하십시오!
미래를 설계하기
시뮬레이션이 다음 혁신을 어떻게 지원할 수 있는지 알아보려면 Ansys와 연결하십시오.
무료 트라이얼
제품 및 서비스
학습하기
회사 정보
Back
제품 및 서비스
ANSYS BLOG
October 15, 2019
How to Use Distributed Computing to Speed Up Product Development
Distributed computing enables engineers to allocate, manage and solve simulations across a heterogeneous variety of computational resources.
Engineers can also use distributed computing to get the most out of their available compute resources, help them sort through the results and find the best designs.
Distributed compute services (DCS) are helpful to a variety of users. For instance, large companies can use DCS to make use of their impressive computational hardware options. Small companies and academics can use DCS to get ahead of the competition by utilizing all of their desktops to solve a series of simulations overnight, or on the weekend.
DCS can break up the project so tasks (like geometry creation, meshing and solving) can all be handled on disparate resources that are optimized for their respective task.

Distributed computing enables engineers to ensure that each part of the simulation workflow is processed by the best computational resource for the task.
Ansys DCS is a family of applications that enables engineers to use distributed computing within the Ansys portfolio. It includes a design point service (DPS) that helps engineers manage tens of thousands of simulation design points, iterations and tasks that are spread across clusters, networks and operating systems. Engineers can learn how to use this system by following the steps below.
Setting Up Distributed Computing Evaluators and DCS Servers
Ansys DCS is designed to robustly handle more than 10,000 design points. However, to get the maximum benefit of a DPS server, engineers will want to connect it to multiple distributed computing evaluators (DCEs). DCEs are execution agents that submit and run pending compute tasks from the projects assigned to them.
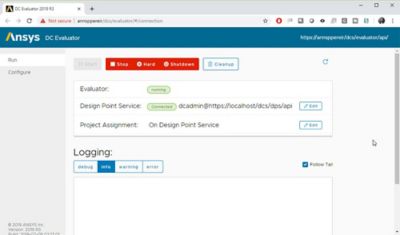
What a DCE looks like when it’s connected to a DPS server on a local machine (the default).
Engineers will only need to set up DCS servers and DCEs once — though their settings can always be updated. Once the DCS server and DCEs are set up, they can be used by multiple users on multiple projects.
To set up a DCE, engineers need to click on the DCS server and evaluator options under the Ansys branch of the start menu. Once the server starts, engineers can set up its authentication service (users and passwords). From there, they can see the server URL. This URL is needed to have a project run on Ansys DCS.
Engineers can launch the DCE or adjust its configurations at any time. To get a distributed compute running, they will need to connect the DCE to a specific DPS server. For production work, engineers can connect a lot of DCEs to a server.
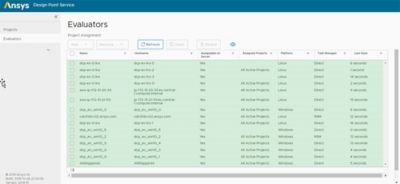
The evaluators page lists all the DCEs on a DCS server.
The evaluators page displays all the DCEs that are configured to a specific DPS server. DCEs can be of different types and run on different operating systems. For instance, engineers can configure local DCEs and remote DCEs that might run on a cloud service. They can also configure which software is available on each DCE or choose the default setting, which makes all of the Ansys software on that DCE available to the DPS server. Engineers can also click on any DCE to adjust its configuration, connect it to a different DPS server, assign it to a project and more.
Though engineers could assign a specific project to a DCE, it’s typically best to manage these priorities from the DPS project tab.
Step 1: Set Up a Project to Run on the Ansys Distributed Compute Services
For demonstrative purposes, this example will utilize the simulation of a basic heat exchanger with parameterized inputs and outputs.
The first step to set up an Ansys DCS project is to open and set up the
simulation in Ansys Workbench.
Engineers who want to test out the capabilities of Ansys DCS will benefit from how quickly a test simulation like this will run. However, the more complex the project is, the more advantage you get from switching to distributed computing.
The steps to set up an Ansys DCS project start with opening the project in Ansys Workbench and setting it up as any other parameterized simulation.
Step 2: Create Design Points That Can Be Updated Using Distributed Computing
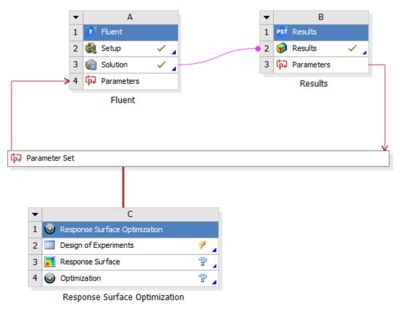
Next, engineers need to set up design point variations. There are a few ways to do this but Ansys DesinXplorer is one of the easiest. To drive the parameter updates, drag and drop a system from the design exploration toolbox into the Workbench schematic.
To set up the design of experiments (DOE) type, input ranges and
other variables, click on the DOE cell.
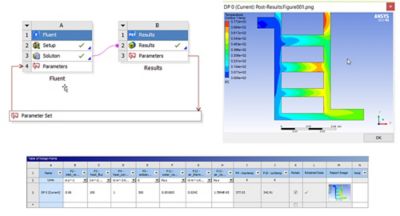
Next, click on the design of experiments (DOE) cell to set up the DOE type, input ranges and other variables. In this example, the default DOE settings were used. Engineers can click on the “preview” button to see the table of design points.
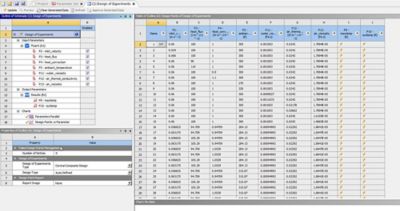
The table of design points
Step 3: Start Using Ansys DCS for Distributed Computing
Workbench is now ready to solve the simulation on the local system. However, to solve the simulation using Ansys DCS, engineers will need to adjust the “Update Option.”
To do this, engineers need to go back to the “Project Tab” (the Workbench schematic view) and left click on the “Parameter Set” bar to see the project’s properties. Then they can set “Update Option” to “Submit to Design Point Service.”
If a DCS Server is available, engineers can point to its URL. The default setup is for Ansys DCS to run the service on a local machine.

To use distributed computing, set the “Update Option” to “Submit to Design Point Service (DPS).”
At this point, engineers can enter a database name (or keep the default) and set a time out parameter. They can also set the local machine to be a DCE by clicking on that option.
To distribute the number crunching between different tools and DCEs, engineers can use the “Update Design Points in Steps” function. For instance, the project can use Ansys SpaceClaim to update the geometry and Ansys Fluent to generate results. SpaceClaim could be running on a Windows machine while Fluent runs on a Linux cluster, cloud service or local machine.
Each DCE knows what sort of work it can pick up and pulls the steps that it can complete. The required files are transferred to the DCE as each update proceeds. Distributed computing can be massively parallel because the DCEs can work simultaneously, complete their assigned tasks and then output parameters and required design points back to the DCS server.
Step 4: Update All Design Points Using Distributed Computing
Steps 1 to 3 ensure that all the design point updates will be evaluated through the DPS server.
Engineers should note that at this point, some popups will appear.
The first pop-up asks to save the project. Once engineers save the projec, it’s sent to the server.
The second pop-up produces the DPS project on the server when the engineer clicks “Create.”
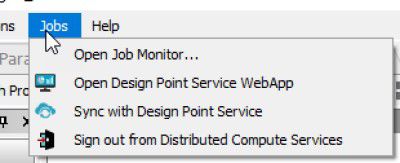
To sync with Ansys DCS, engineers may have to go into the “Jobs” menu.
Depending on the computational setup, some engineers may need to sync with Ansys DCS via the “Jobs” menu.
Step 5: Access the Ansys DCS Web App
There are several ways engineers can access the Ansys DCS web app. The easiest ways are to:
- Click on the “Monitor” icon at the bottom-right of the screen
- Click on the “Jobs” menu
Depending on a company’s firewall setup, the web browser may not have access to the Ansys DCS web app right away. If this happens, engineers need to check with their IT team to ensure they create an “https credential” for the Ansys DCS web app.
Once the web app opens, login. The first-time an engineer signs in, “dcadmin” will be the username and password.
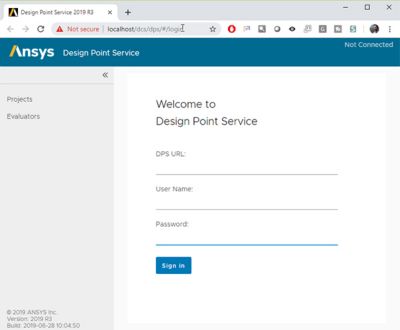
Set up the Ansys DCS web app login as soon as possible so that the default login information changes.
However, they should reset this login information as soon as possible — for security reasons — so that the default names and passwords are changed.
Step 6: Monitor Ansys DCS as it Solves the Model Using Distributed Computing
This is the fun part. Engineers can use the Ansys DCS web app to monitor, solve and manage the design point data.
Engineers need to select their project from the list on the DPS server. Then, they can access the design point statistics to see how many iterations are running, completed or timed out.

Design point statistics show engineers how the project is running.
Engineers can also take a closer look at the individual design points iterations to dig deeper into the results.
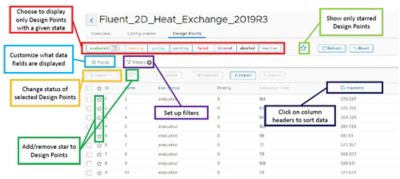
Engineers can access the data of any design point iteration from this chart. They can also customize
how the data is presented. The check boxes and stars help engineers compare and flag the best results.
Engineers can click on any particular design point to look at the details of that specific iteration. Some of these details include:
- Log files
- Parametric information
- Evaluation information
- Results
Engineers can focus on a few design points or thousands. When working with a lot of design points, engineers can filter and sort them based on various parameters.
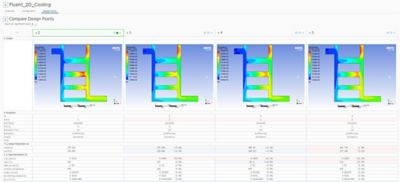
Engineers can visually compare up to five design point iterations.
Once engineers have reduced the list to a few candidates, they can compare up to five of them visually. This is done by selecting the design points of interest, using the check boxes, and clicking the “Compare” button. Similarly, the stars on each row can help engineers remember their favorite designs so they can be easily brought back into Workbench.